Layout Tools
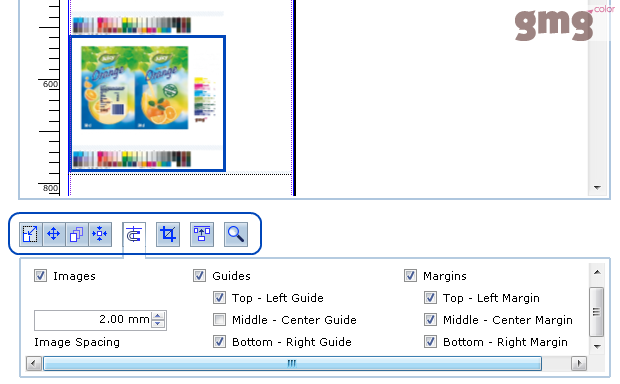
Image positioning with guides and margins.
Guides help you to align image elements to the horizontal or vertical axis. Guides appear as nonprinting lines that float over the job. You can move and remove guides from the preview area.
You can place a new guide by clicking into the vertical ruler on the left side or into the horizontal ruler on the top. You can then move the guide to a position in the job area by holding down the left mouse button and dragging the cursor with the mouse. Likewise, you remove a guide by dragging it outside the job area.
Guides are only active if the option Guides is selected in the tools pane beneath the preview area. Likewise, the job margins are only active as guides if the option Margins is selected.
Below the Guides check box, you can define to which sides of the selected image the guides will 'respond' by activating the corresponding check boxes. The left part of the option refers to horizontal guides, the right part to vertical guides. So, if you select the option Top - Left Guide, the top border of the selected image frame will stick to a horizontal guide, the left border will stick to a vertical guide. If you select Middle - Center Guide, the guide will serve as an axis of reflection. Margins are handled in the same way as guides.
You can resize the margins by entering values into the edit boxes in the settings pane on the left (Job > Settings > Margins).
In a similar way as with guides, you can align one image to another. Enter a desired Image Spacing to define the distance to the other image. The defined distance is maintained by a (hidden) guide. This way, you can manually place one image next to the other always keeping a precise distance.
Click the Zoom button in the tools pane beneath the preview area.
| Option | Description | See also |
|---|---|---|
| Fit View to Width | Fits the media width in the preview area. | |
| Fit View to Height | Fits the job length in the preview area. | |

|
Select the Zoom mode by clicking the + or the – magnifying glass button. The mouse pointer becomes a magnifying glass with a + or – sign in its center. Click in the center of the area that you want to magnify or reduce. Hold down the ALT key to switch to the opposite Zoom mode. Each mouse click magnifies or reduces the view. | |
| Show Transparent Background | If Show Transparent Background is selected, a transparency checkerboard is shown as a background for transparent areas in an image. If the option is not selected, paper white is shown for transparent areas. | Printing an Undercoat |
When creating a job with multiple images or PDF pages (manual or workflow job), GMG ColorProof automatically optimizes the job layout for a minimum paper usage.
However, if you manually add a new image to a job, the new image is placed following the existing images, to avoid messing up your layout. You can always use the Automatic Image Placement feature to rearrange and thus optimize the layout.
You can choose the orientation mode and a horizontal and vertical spacing between the images.
| Orientation mode | Description |
|---|---|
| Original | Keeps the original orientation of the image or PDF page as defined in the input file. |
| Keep Current | Keeps the current orientation of all images. Images will be repositioned to optimize the layout, but not rotated. This option is especially helpful if you need a specific orientation or if you have a multi-page PDF and you want to keep all pages in a portrait orientation. |
| Automatic | Rotates images and PDF pages to minimize paper usage. |
| Portrait | Rotates images and PDF pages to Portrait orientation, i. e. so that the height is greater than the width. |
| Landscape | Rotates images and PDF pages to Landscape orientation, i. e. so that the width is greater than the height. |
See also:
Click the Crop button in the tools pane beneath the preview area. You can crop images from the borders, two points (which are displayed on a thumbnail image), or from width/height. Use Crop to Fit to crop the image to fit to the media width. This crops the part of the image which is exceeding the roll width.
The option Use PDF Bounding Box allows you to define the boundaries of a PDF document. There are five page boxes in the drop-down list you can choose from.
See also: